This article is in response to a request from a reader and addresses a topic dear to my heart. The position and use of the back in rowing is central to both safe and fast rowing. A good back position makes a rower faster and simultaneously protects his back from damage.
The key to understanding back position in rowing is the concept of a neutral pelvis. In good posture the pelvis is said to be neutral and aligns with the lower vertebrae of the spine. If an athlete holds her pelvis in neutral and reaches forward to approach the catch the pelvis rotates and length is achieved by stretching the hamstring and gluteus muscle groups. Then during the drive these large and powerful muscles can contract and add power to the movement and swing of the torso and thus power and speed to the stroke.
The abbreviated sequence below shows this:
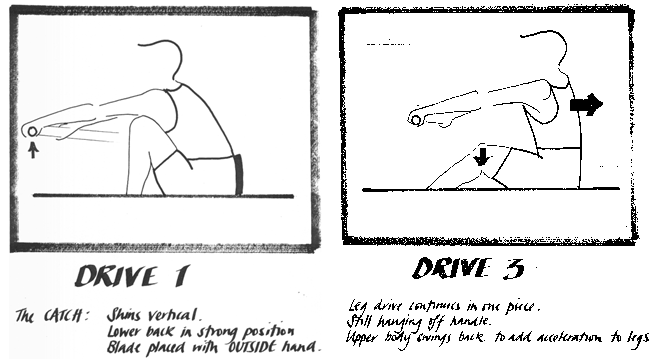

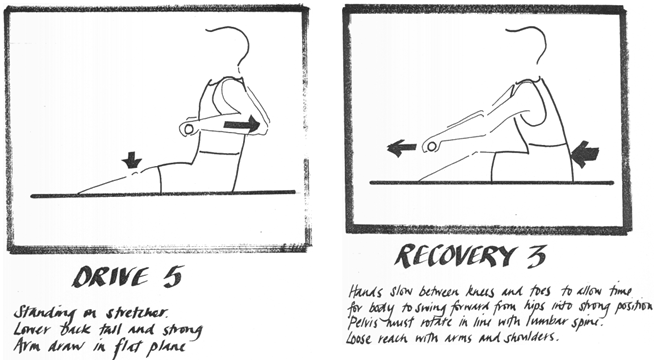

A neutral pelvis is also the key to preventing back injuries in rowing. If the back and pelvis are kept aligned and reach forward is gained by rocking the hips then the back is much safer. This is because with a straight spine the loads on the inter-vertebral discs are spread rather than concentrated. In order to reach and hold good back positions the abdominal (core) muscles must be strong and the hips and hamstrings flexible.


These two examples above both show high risk back positions. Rowing like this exposes the low back to high loadings and risks disc injury.
Compare the position of the rower below to the two scullers above.
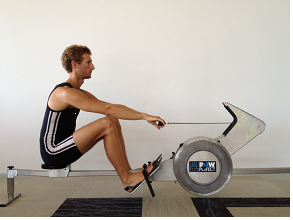

Not only is he minimising the chance of damage to his spine he is in a position where he can use the gluteal group and the hamstrings to swing his body towards the finish and add much extra power in the latter parts of the drive.
Achieving and holding a neutral pelvis position in rowing requires strength, flexibility and control in the abdominal, hip and hamstring area muscles. All rowers and scullers should do some land training to strengthen and mobilize the low trunk and hip areas. Pilates, Yoga and many of the variants of Core Strength training are all good.
There is another page on the Rowperfect site that deals with the same issue. Follow this link.
Duncan





This Post Has 5 Comments
Hi Duncan, I liked your article. I try and hammer the point home with my rowers and haven’t (so far) had any back issues that weren’t pre-existing. Seeing as I coach predominately Masters- everything is pre-existing!!
I attended the Cambridge Cup in January and for the first time ever in NZ noticed the curved back position in the school kids rowing. What is the go with that in NZ? Is someone spouting a new (old) technique because all I could see was a whole lot of sore backs coming up in the rowers.
Kind regards,
Kathy
Thanks for the feedback Kathy, always appreciated!
I like the quip about everything in masters is pre-existing. As to why the low back positioning is often ignored I believe it it is a combination of a lack of appreciation of the dangers of bad posture and potential benefits of good posture combined with the difficulty of effecting a change. To change posture long term requires a major effort by coach and athlete.
I am not aware of anyone actively promoting a round low back and suspect it has more to to with neglect.
Regards,
Duncan
Great article! Thanks for making this very important point.
The experts all use a rounded back!
Straightening the back preloads the spine.
The spine needs to curve to allow an efficient long reach. Allow the whole spine to curve comfortably, or straighten the visible upper spine and overflex the lower spine? The experts do the former!
In order to reduce the load on the spine, particularly the lower bit I suggest the following.
1. Layback at the catch. Rotate your torso about a point near the ribs as you take the catch. The shoulders should now be just behind the hips, so that torso weight now reduces, rather than adding to, the load on the lower back. During this layback your hips will move about 75mm closer to your feet, thus increasing the leg drive..
2. Lower the gate height as much as possible to reduce the load on the lower back. Mine is 125mm, whereas most club gates are at about 170mm.
3. Square the blade for the catch as late as possible, and feather it while it leaves the water. These will allow a lower gate height. Feathering early can also add a little to driving the boat.
4. Approach the catch with the arms comfortably bent. As your body gently changes direction without jerking, your arms can be pulled straight, by the decelerating blade, for the catch. They then rebend a little taking the inevitable jerk of the catch. Your shoulders, now behind the hips, now take the strain.
5. Breath out for the catch, and the release. 2 breaths per stroke – always!.
This works in a boat or on the erg.
Have fun
Greetings. Remove the part of the seat which contacts your tailbone, or add a pad to raise the other parts.
Have painless fun!