
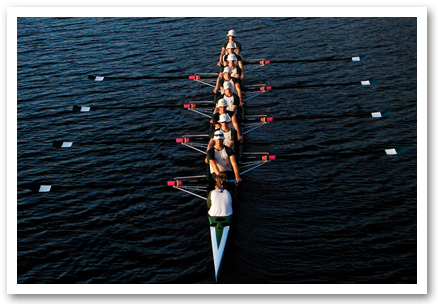
A reader, in the Rowperfect reader questionnaire has asked about rigging. Sarah W in the UK would like more information on:
Rigging details according to the height of the rower and also his/her shoulder width.”/p>
General guide to basic rigging
Once upon a time I wrote some information about this which can be found on Rowing New Zealand’s website. What I drafted then has been edited a little. This was based on a combination of my experience coaching and on readings taken from Volker Nolte’s “Rowing Faster”, Mike Davenport’s “Nuts and Bolts Guide to Rigging”, and other readings from Valery Kleshnev’s Rowing Biomechanics Newsletter.
The obvious is not always obvious!
The page gives recommendations for a range of oar or scull lengths and rigging spreads/spans for various age ranges and competitive “communities”. A 15 year-old novice female sculler should not be asked to row in a boat that is rigged for heavyweight male Olympic Gold Medal winners. While that seems obvious, it often occurs when boats get handed down from club heavy competitive crews for the “novvies” to row, and it doesn’t always work.
Height
If you find that the following hints about rigging height do not work, you may need a different boat.
A way to check for the correct combination of boat size and rigger height comes from Howard Croker, Croker Oars, who advised me that the bottom of the oarlock should be set at 26 cm above the surface of the water. In Sculling this is the “top” oarlock (normally bow side), and in rowing it’s all oarlocks. This, if I recall Howard’s comments correctly, puts the blade in the water at the angle its design is made for best efficiency in the water.
Some folks rig sculling oarlocks to the same height relative to the boat, and others rig with as much as 2 cm height difference, where most rigging manuals I’m aware of suggest something between 5 and 10 mm “left” above “right” (some places row right above left).
- Sit the crew in the boat, float a thin piece of plywood under the rigger being measured, make sure the boat is level, and measure from the “sill” (inside bottom) of the gate to the bit of plywood floating on the water’s surface.
 Another way for rowing (Pair, Four, or Eight)
I learned this method from Al Morrow when he was Canada’s women’s lead coach, in the 1990s.
First – is the boat about the right size?
How to test? Without getting fancy, set a basic rig to the boat (e.g., an 8+ with 84 cm span (between the middle of the pin and the middle of the keel, measured horizontally with the boat level), and oars with 114 cm inboard, pins aligned vertically, 4 degree pitch-plugs in the oarlocks, and zero-degree pitch on the blades).
- Sit the entire crew in the boat.
- Place a spirit-level across the gunwales (top of the sides of the boat) and have everyone in the crew hold their handles so that the bubble in the spirit-level is centered.
- One seat, or one pair of seats at a time, have the athletes sit with legs “straight”, body in the “upright” position, and with the blade square, handle resting atop the thigh muscles just at the intersection of the thighs with the body, check the space between the bottom edge of the blade and the surface of the water.
- If you can see approximately enough space between the bottom edge of the blade and the surface of the water for a fully spread out hand, you have about the correct height setting (i.e., spread your hand so that the tip of the thumb and the tip of the fifth finger (pinkie?) are as far apart as you can make them – thumb touching the bottom edge of the blade, little finger touching the water).
- If the blade can’t be raised or lowered enough via moving spacer-washers above or below the pin, you need a different boat.
For Sculling boats
You can try measuring for 26 cm to the water from the oarlock, or you can try a starting “height” of the “high side” to be 17 cm above the top of the person’s seat. (This isn’t the forum for a lengthy description of how to measure gate height).
- Then, sit the crew in the boat – level across the gunwales.
- In a “static” situation (someone standing in the water holding the boat level, for example) have the crew – perhaps one at a time – sit at the catch position, the “release” position and see if they can handle the blades – can they clear the water with the blades squared for the full recovery?
- If they can’t hold squared blades above the surface (about 3 cm above the water) without excessive lowering of the handles, then the boat is too “low” or perhaps the hull is too small. i.e., there should be some room between the handles and the “tops” of the thighs for the handles to lower some more – having raced a 12 km time trial in a double rigged for LW, this HM had rub marks on his thighs from the scull handles…
- If they can’t get at least 30 cm of oar shaft under the water in the first half of the stroke, with their handles NOT going higher than their shoulders, then the rig is too high or the boat is too big.
After these checks, go for a row!
If the crew can row with balance, use the full crew. Further checks, as you observe the crew, include:
- In the first half of the stroke, is the outside hand (or “top” hand, sculling) near but slightly below the height of the shoulder?
- At the same time is the blade completely buried (with 30 or 40 cm of shaft at a minimum for sweep or scull, respectively, under water)?
If these two “criteria” can’t be met, you may need to raise or lower the gates slightly.
- In the last half of the stroke, can the crew keep the blades reasonably well buried while using a “normal” stroke pathway? (Not having to pull the blades up to their chins to avoid washing out, and not having to scrape their thighs to avoid crabbing.)
- In the recovery, can the crew, using a reasonable handle path for the recovery, keep the bottom edge of a squared blade approximately 2-3 cm above the water? (Square blade rowing is not normal rowing – I use it to check rigging and to train handle pathway in very specific exercises, and I don’t use it as a regular training device.)
Next I’m going to talk about Rigging for people of different widths.
 But if you like to get more from Walter Martindale, you can go and buy his coaching advice in the Rowperfect shop.
Rigging books in the Rowperfect Shop:
Rowing Faster – 2nd Edition by Volker Nolte
Nuts Bolts Guide to Rigging e-book by Mike Davenport
Rig Up Your Life – free rigging advice by Mike Davenport
Absolutely Maximise Your Rigging Numbers ebook by Mike Davenport


This Post Has One Comment
Experienced scullers feather WHILE, not AFTER, the spoon leaves the water.
Benefits of this are: 1. Feathering drives the boat.
2. The spoon is raised less than if feathered out of the water. This reduces the vertical load on the gate, and boat.
Because of the reduced vertical movement of the blade handle it can be pulled at a lower height. This reduces the load on your back particularly.
My gates are 120 and 130 mm above the seat – left side higher.
I also do 1:1 in:out always, with 2 breaths per stroke- out at the catch and release. Back relaxed and curved. Arms relaxed during the recovery, straightening briefly for the catch.
Have fun.